因为在某些情况下父类加载器需要委托子类加载器去加载class文件。受到加载范围的限制,父类加载器无法加载到需要的文件,以Driver接口为例,由于Driver接口定义在jdk当中的,而其实现由各个数据库的服务商来提供。
比如mysql的就写了MySQL Connector,那么问题就来了,DriverManager(也由jdk提供)要加载各个实现了Driver接口的实现类,然后进行管理,但是DriverManager由启动类加载器加载,只能记载JAVA_HOME 的lib下文件,而其实现是由服务商提供的,由系统类加载器加载,这个时候就需要启动类加载器来委托子类来加载Driver实现,从而破坏了双亲委派,这里仅仅是举了破坏双亲委派的其中一个情况
我们结合Driver来看一下在spi(Service Provider Interface)中如何实现破坏双亲委派。
先从DriverManager开始看,平时我们通过DriverManager来获取数据库的Connection:
String url = "jdbc:mysql://localhost:3306/testdb";
Connection conn = java.sql.DriverManager.getConnection(url,"root","root");
在调用DriverManager的时候,会先初始化类,调用其中的静态块:
static{
loadInitialDrivers();
println("JDBC DriverManager initialized");
}
private static void loadInitialDrivers(){
…
//加载Driver的实现类
AccessController.doPrivileged(new PrivilegedAction
public void run(){
ServiceLoader
Iterator
try{
while(driversIterator.hasNext()){
driversIterator.next();
}
} catch(Throwable t){
}
return null;
}
});
…
}
为了节约空间,笔者省略了一部分的代码,重点来看一下
ServiceLoader.load(Driver.class):
public static ServiceLoader load(Class service){
//获取当前线程中的上下文类加载器
ClassLoader cl = Thread.currentThread().getContextClassLoader();
return ServiceLoader.load(service,cl);
}
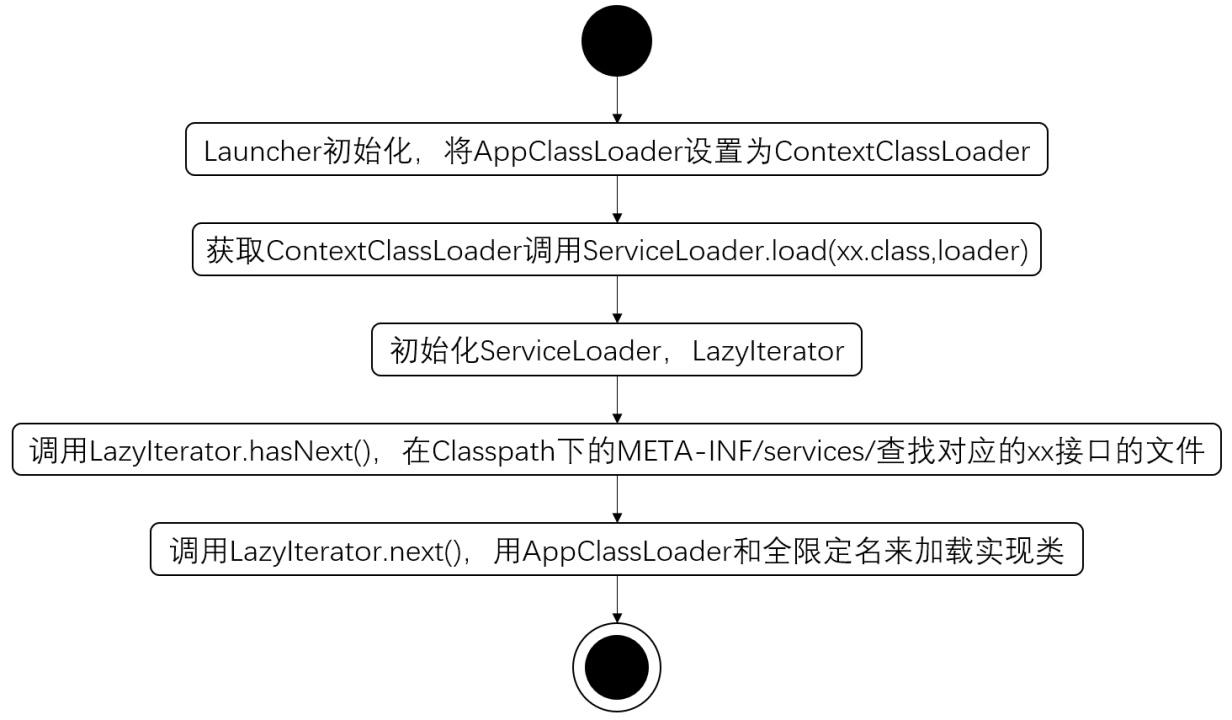
可以看到,load方法调用获取了当前线程中的上下文类加载器,那么上下文类加载器放的是什么加载器呢?
public Launcher(){
…
try{
this.loader = Launcher.AppClassLoader.getAppClassLoader(var1);
}catch (IOException var9){
throw new InternalError("Could not create application class loader", var9);
}
Thread.currentThread().setContextClassLoader(this.loader);
…
}
在sun.misc.Launcher中,我们找到了答案,在Launcher初始化的时候,会获取AppClassLoader,然后将其设置为上下文类加载器,而这个AppClassLoader,就是之前上文提到的系统类加载器Application ClassLoader,所以上下文类加载器默认情况下就是系统加载器。
继续来看下ServiceLoader.load(service,cl):
public static ServiceLoader load(Class service,ClassLoader loader){
return new ServiceLoader<>(service,loader);
}
private ServiceLoader(Class svc,ClassLoader cl){
service = 0bjects.requireNonNull(svc,"Service interface cannot be null");
//ClassLoader.getSystemClassLoader()返回的也是系统类加载器
loader = (cl == null)? ClassLoader.getSystemClassLoader():cl;
acc = (System.getSecurityManager() != null)? AccessController.getContext():null;
reload();
}
public void reload(){
providers.clear();
lookupIterator = new LazyIterator(service,loader);
}
上面这段就不解释了,比较简单,然后就是看LazyIterator迭代器:
private class LazyIterator implements Iterator{
// ServiceLoader的iterator()方法最后调用的走这个迭代器里的next
public S next(){
if (acc == nul1){
return nextService();
}else {
PrivilegedAction action = new PrivilegedAction(){
public S run() { return nextService();}
};
return AccessController.doPrivileged(action, acc);
}
}
private S nextService(){
if (!hasNextService())
throw new NoSuchElementException();
String cn = nextName;
nextName = null;
Class<?> c = null;
//根据名字来加载类
try{
c = Class.forName(cn,false,loader);
}catch (ClassNotFoundException x){
fail(service,
"Provider " + cn +" not found");
}
if (!service.isAssignableFrom(c)){
fail (service,
"Provider " + cn + " not a subtype");
}
try {
S p = service.cast(c.newInstance());
providers.put(cn,p);
return p;
}catch (Throwable x){
fail(service,
"Provider " + cn+ "could not be instantiated",x);
}
throw new Error(); // This cannot happen
}
public boolean hasNext(){
if (acc == null){
return hasNextService();
}else{
PrivilegedAction
public Boolean run(){return hasNextService();}
};
return AccessController.doPrivileged(action, acc);
}
}
private boolean hasNextService(){
if (nextName != null){
return true;
}
if (configs == nul1){
try {
//在classpath下查找META-INF/services/java.sql.Driver名字的文件夹
// private static final String PREFIX = "META-INF/services/";
String fullName = PREFIX + service.getName();
if (loader == null)
configs = ClassLoader.getSystemResources(fullName);
else
configs = loader.getResources(ful1Name);
} catch (IOException x){
fail(service, "Error locating configuration files", x);
}
}
while((pending == null) || !pending.hasNext()){
if(!configs.hasMoreElements()){
return false;
}
pending = parse(service,configs.nextElement());
}
nextName = pending.next();
return true;
}
}
好了,这里基本就差不多完成整个流程了,一起走一遍:

Was this helpful?
0 / 0